

High Altitude Tangzhong Pan Pizza Dough
This dough recipe is identical to the one found here, but with different quantities in order to fill a half sheet pan (~11¾” x 16¾” or 29.8 x 42.5 cm). This pizza dough is very hydrated because it uses the bread making method known as Tangzhong. The method is simple: whisk together 5 parts water with 1 part flour (by weight), then heat the mixture. It should thicken and become gelatinous. Let it cool briefly (so as not to kill the yeast), then add it to the remaining ingredients. While the gelatinous mixture is still hot, I like to pour in some of the extra water in order to speed the cooling process and thin the mixture. This will also help it incorporate into the flour mixture later.
The type of flour makes a big difference when it comes to pizza dough, so you should try to use a high protein flour (as high as you can find). At most grocery stores, the highest protein option is a bread flour (12-13% protein) which works beautifully. But an even better option than run-of-the-mill bread flour is King Arthur Hi-Gluten Flour (14% protein), which is available online. The following recipe is designed for a high gluten flour, which will need a bit more water than other flours in order to properly hydrate. If you are using regular bread flour, make the noted adjustments.
I prefer instant yeast, but I have also included an alternative pizza dough recipe (scroll down), for those of you who prefer using active dry yeast. See note here on instant yeast versus active dry yeast.
For topping variations:
See my Crispy Edged Cheese Pan Pizza recipe here.
See my Eggplant Pan Pizza recipe here.


Tangzhong Pan Pizza Dough (Using Instant Yeast)
(Scroll down for recipe using Active Dry Yeast)
3¼ cups Hi-Gluten or bread flour (14 ounces or 397 grams) - divided (see note for accurately measuring flour here)
1 teaspoon (3 grams) instant yeast
2 teaspoons (6 grams) kosher salt (decrease if using table salt)
1½ cups + 1 tablespoon water - 12.5 ounces or 354 grams- divided (use 1½ cups - 1 tablespoon water - 11.5 ounces or 326 grams if using regular bread flour). More water may be necessary, especially in the drier winter months
Make the Tangzhong: In a saucepan, whisk together 1.3 ounces flour (5 tablespoons or 37 grams ) with 6.5 ounces water (¾ cup + 1 tablespoon or 184 grams) until smooth. Heat and continue whisking until the mixture is thick and gelatinous; I recommend waiting until the solution bubbles in order to ensure that the mixture has reached the necessary temperature. (Switch from a whisk to a rubber spatula if necessary.) Stir continuously, as you want a smooth mixture without lumps. Remove from heat, and add enough of the reserved water (about ⅓ cup or 77 grams) to cool the mixture sufficiently so as not to kill the yeast when the solutions are mixed.
Place remaining 12.7 ounces or 360 grams of flour into a large bowl with the instant yeast and salt. Stir. Make a well in the center of the dry ingredients and add the cooled, diluted gelatinous mixture to the bowl. Add ¼ cup (2 ounces or 57 grams) water (or, if using regular bread flour, 2 tablespoons or 28 grams water). Stir all ingredients together, then let it sit for 1 minute as the flour absorbs the liquid. After 1 minute, add more water as needed (this amount will vary based on humidity levels and the season, but you'll probably need 1 or 2 tablespoons - 14 to 28 grams). You want a moist and craggy dough (see my picture above). Rather than knead the dough, I prefer to simply stretch and roll it. The wet tangzhong dough benefits from the no knead method. I have tried many different techniques - and I have come to prefer stretching and folding the dough ~ 3-4 times during the rising time - instead of just one time as it makes a lighter and airier dough (but still chewy). So after making the craggy dough - cover the bowl with plastic wrap and let rest ~ 30 minutes. Now that the dough has rested - stretch and fold the dough as follows: Using a rubber spatula or your fingers, lift part of the dough, stretch it, and then fold it back onto the ball of dough. Rotate the bowl 90° and repeat pinching, stretching and folding 3 more times until you have made your way around the bowl. I then lift the ball of dough out of the bowl and continue to pull the dough onto itself to form a tight ball. Replace the dough in the bowl and cover. Repeat this stretching and folding process approximately every 40 minutes. Do this 2 more times. Cover and rest 30 minutes. (The entire process of resting and stretching will take about 2½ - 3 hours.) Note: If this dough schedule doesn’t mesh with your schedule - just do what does work into your schedule even if it is only one stretch and fold (I previously always did one stretch and fold and was very happy with the results). This dough is very forgiving.
If you do not plan on using the dough until the next day (which I recommend), place the dough ball into an un-greased bowl, then cover it with plastic wrap in the refrigerator. (I prefer making the dough a day ahead because 1) a slow rise results in a more flavorful dough, and 2) working with cold dough is easier - you are less likely to tear a hole in the dough or stretch it too thin.) If you are using the dough the day you make it, cover and let rise about 30 minutes - 1 hour before proceeding as below.
If using the dough the next day, refrigerate dough. The next day, remove cold dough from the refrigerator and proceed as below.
Forming and Baking the Dough:
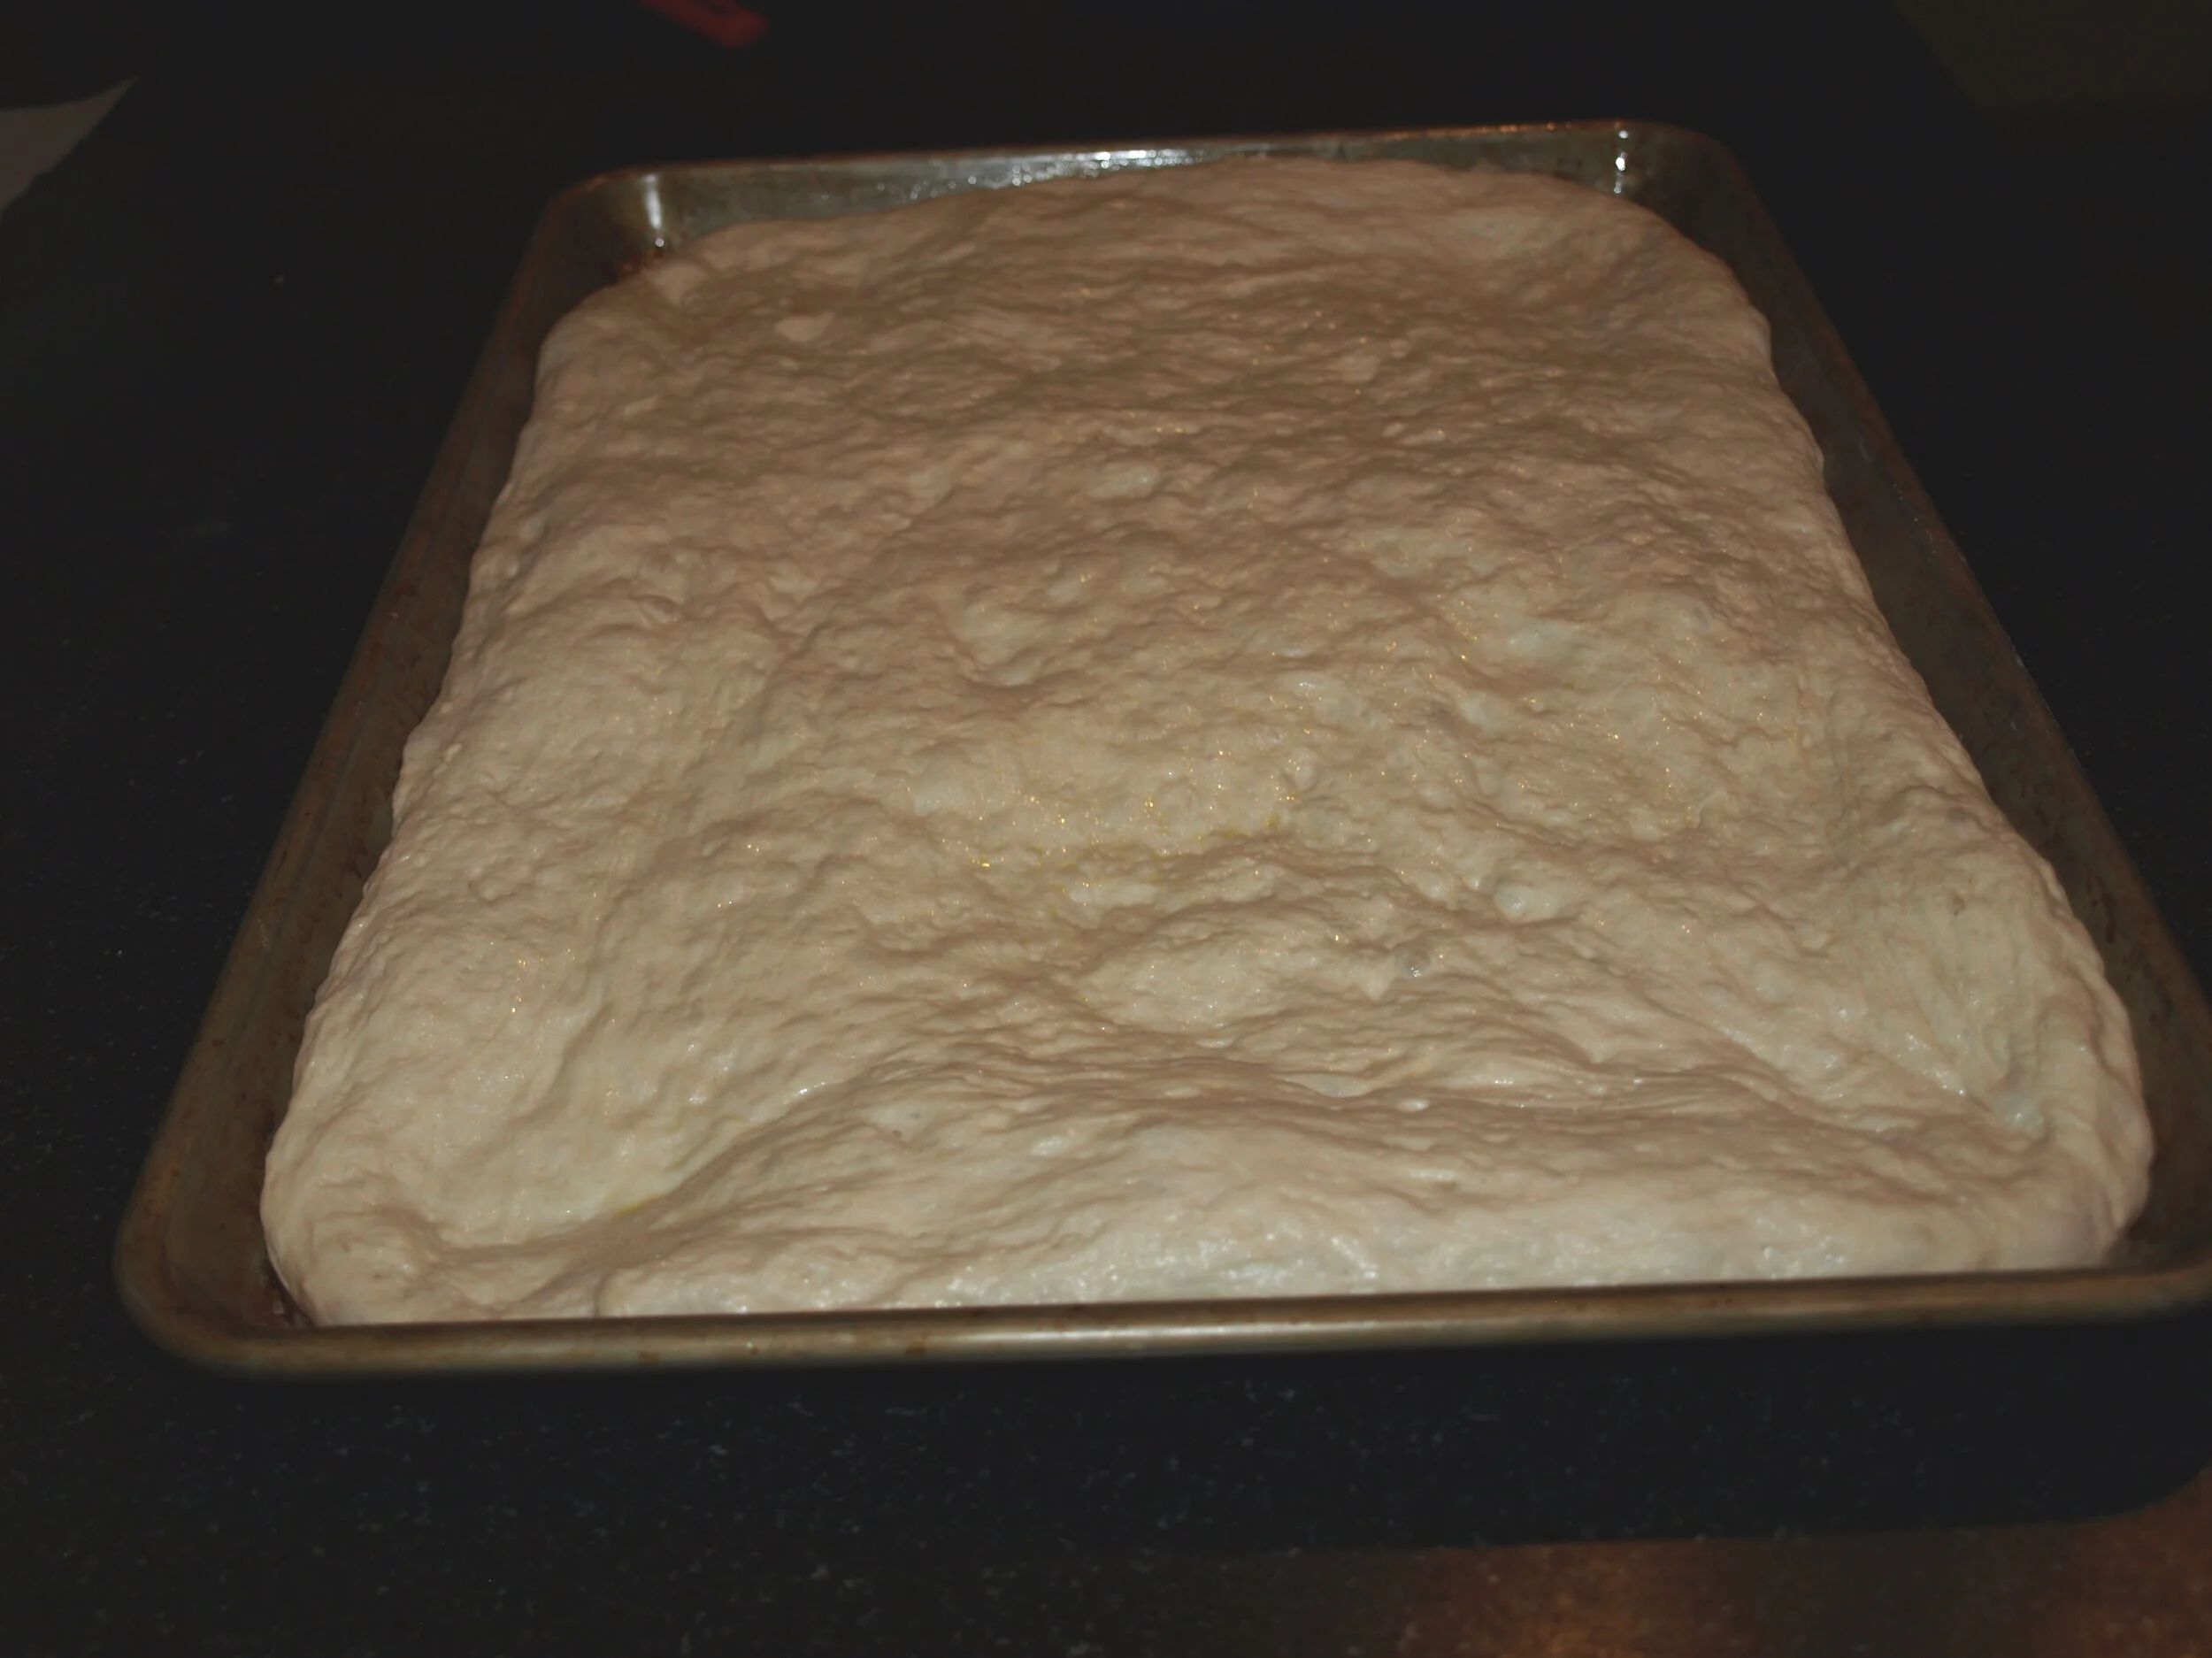
Pour about 2 tablespoons or 26 grams of olive oil into a half sheet pan with sides (~11¾” x 16¾” or 29.8 x 42.5 cm), spreading the oil so that it covers the bottom and the sides of the pan. Note: The size of the pan doesn’t need to be exact - any pan approximately that size with sides will work beautifully. Lightly flour the ball of dough. Press it into an oval disk on a lightly floured board, but make sure to retain the rim around the outer edge. Press the center of the oval while slowly pulling the dough outward, in order to replicate a pan shape with a lip. Lift and stretch the dough, letting gravity help form it into an oval. If it fights back and shrinks when you lay it back on the board, let it rest for a few minutes, then stretch it out again. Repeat this process until your dough is the desired size. Don't use a rolling pin to roll out your dough because this flattens the edges and alters the beautiful shape. Lay your dough in the oiled pan, then carefully flip the dough so that both sides have a thin coating of oil. Cover with plastic wrap and push the dough outward from the middle so that it fills up the pan. You may need to let it rest for 5 minutes before pushing it outwards again. Repeat this process as many times as necessary for the dough to fill the pan. Let it rest so that it can rise one final time before baking (~1-2 hours for cold dough, ~45 minutes for room temperature dough). When I want a very fluffy pizza dough I place the pan of dough in a very warm place (for me that’s the furnace room) for the last 30 minutes of rising time but that probably isn’t necessary in high altitudes as the thin air contributes to a fast and beautiful rise. Preheat oven to 500°F (260°C). Remove the plastic wrap from your rested, risen pizza dough. Top your pizza with topping(s) of your choosing. Carefully spread the topping(s) evenly over the dough. Be careful not to tear the dough. Top with a grating of Parmigiano-Reggiano (for an extra punch of flavor). Bake in a preheated 500°F (260°C) oven for ~10-15 minutes. I like to bake the pizza on the bottom rack as it gives the pizza bottom a nice crust. I move the pizza to a higher rack if the bottom crust is over-browning. Let cool briefly before digging in.
Tangzhong Pan Pizza Dough (Using Active Dry Yeast)
3¼ cups Hi-Gluten or bread flour (14 ounces or 397 grams) - divided (see note for accurately measuring flour here)
1¼ teaspoon (4 grams) active dry yeast
2 teaspoons (6 grams) kosher salt (decrease if using table salt)
1½ cups + 1 tablespoon water - 12.5 ounces or 354 grams- divided (use 1½ cups - 1 tablespoon water - 11.5 ounces or 326 grams if using regular bread flour). More water may be necessary, especially in the drier winter months
Make the Tangzhong: In a saucepan, whisk together 1.3 ounces or 37 grams flour (5 tablespoons) with 6.5 ounces water (¾ cup + 1 tablespoon or 184 grams) until smooth. Heat and continue whisking until the mixture is thick and gelatinous; I recommend waiting until the solution bubbles in order to ensure that the mixture has reached the necessary temperature. (Switch from a whisk to a rubber spatula if necessary.) Stir continuously, as you want a smooth mixture without lumps. Remove from heat, and add enough of the reserved water (about ⅓ cup or 77 grams) to cool the mixture sufficiently so as not to kill the yeast when the solutions are mixed. Whisk the mixture to blend completely.
In a small pan, heat ⅓ cup or 77 grams of the reserved water to ~100°F-110°F - not to exceed 110°F. Pour into a small container and stir in 1 teaspoon (3 grams) of the pre-measured flour (or 1 teaspoon or 4 grams sugar if you prefer). Sprinkle and stir in 1¼ teaspoons (4 grams) active dry yeast. Allow 5-10 minutes for it to get frothy.
Place remaining 12.7 ounces (360 grams) of flour into a large bowl with the salt. Stir. Make a well in the center of the dry ingredients and combine the cooled and diluted gelatinous mixture with the frothy yeast mixture. Stir all of the ingredients together, then let it sit for 1 minute as the flour absorbs the liquid. After 1 minute, add more water if needed (this amount will vary based on humidity levels and the season, but you may need 1-2 tablespoons or 14-28 grams). You want a moist and craggy dough. Cover with plastic wrap (no need to knead) and let rise until its size doubles (~1½—2 hours).
The wet dough benefits from the no knead method. Update: I have tried many different techniques - and I have come to prefer stretching and folding the dough ~ 3-4 times during the rising time - instead of just one time as it makes a lighter and airier dough (but still chewy). So after making the craggy dough - cover the bowl with plastic wrap and let rest ~ 30 minutes. Now that the dough has rested - stretch and fold the dough as follows: Using a rubber spatula or your fingers, lift part of the dough, stretch it, and then fold it back onto the ball of dough. Rotate the bowl 90° and repeat pinching, stretching and folding 3 more times until you have made your way around the bowl. I then lift the ball of dough out of the bowl and continue to pull the dough onto itself to form a tight ball. Replace the dough in the bowl and cover. Repeat this stretching and folding process approximately every 40 minutes. Do this 2 more times. Cover and rest 30 minutes. (The entire process of resting and stretching will take about 2 - 3 hours.) Note: If this dough schedule doesn’t mesh with your schedule - just do what does work into your schedule even if it is only one stretch and fold (I previously always did one stretch and fold and was very happy with the results). This dough is very forgiving.
If you do not plan on using the dough until the next day (which I recommend), place the dough ball into an un-greased bowl, then cover it with plastic wrap in the refrigerator. (I prefer making the dough a day ahead because 1) a slow rise results in a more flavorful dough, and 2) working with cold dough is easier - you are less likely to tear a hole in the dough or stretch it too thin.) If you are using the dough the day you make it, cover and let rise about 30 minutes - 1 hour before proceeding as below.
If using the dough the next day, refrigerate dough. The next day, remove cold dough from the refrigerator and proceed as below.
Forming and Baking the Dough:
Pour about 2 tablespoons or 26 grams of olive oil into a half sheet pan with sides (~11¾” x 16¾” or 29.8 x 42.5 cm), spreading the oil so that it covers the bottom and the sides of the pan. Note: The size of the pan doesn’t need to be exact - any pan approximately that size with sides will work beautifully. Lightly flour the ball of dough. Press it into an oval disk on a lightly floured board, but make sure to retain the rim around the outer edge. Press the center of the oval while slowly pulling the dough outward, in order to replicate a pan shape with a lip. Lift and stretch the dough, letting gravity help form it into an oval. If it fights back and shrinks when you lay it back on the board, let it rest for a few minutes, then stretch it out again. Repeat this process until your dough is the desired size. Don't use a rolling pin to roll out your dough because this flattens the edges and alters the beautiful shape. Lay your dough in the oiled pan, then carefully flip the dough so that both sides have a thin coating of oil. Cover with plastic wrap and push the dough outward from the middle so that it fills up the pan. You may need to let it rest for 5 minutes before pushing it outwards again. Repeat this process as many times as necessary for the dough to fill the pan. Let it rest so that it can rise one final time before baking (~1-2 hours for cold dough, ~45 minutes for room temperature dough). When I want a very fluffy pizza dough I place the pan of dough in a very warm place (for me that’s the furnace room) for the last 30 minutes of rising time but that probably isn’t necessary in high altitudes as the thin air contributes to a fast and beautiful rise. Preheat oven to 500°F (260°C). Remove the plastic wrap from your rested, risen pizza dough. Top your pizza with topping(s) of your choosing. Carefully spread the topping(s) evenly over the dough. Be careful not to tear the dough. Top with a grating of Parmigiano-Reggiano (for an extra punch of flavor). Bake in a preheated 500°F (260°C) oven for ~10-15 minutes. I like to bake the pizza on the bottom rack as it gives the pizza bottom a nice crust. I move the pizza to a higher rack if the bottom crust is over-browning. Let cool briefly before digging in.

