

High Altitude Pizza Dough
Regarding yeast doughs, there are a few primary differences that distinguish high altitude baking from its sea level counterpart. These include: the need for more water (due to the dry air), a shorter rise time, and less yeast (due to less atmospheric pressure). The pizza dough I most love to make is wet and use small amounts of yeast, so it lends itself perfectly to high altitudes with a minimal amount of adjustments. I’m a big believer in eating pizza at least once a week, so this recipe was one of my first high altitude adaptations.
This pizza dough is very hydrated because it uses the bread making method known as Tangzhong. Popular among Japanese and Chinese bread makers, the Tangzhong method results in an incredibly light and moist dough. The method is simple: whisk together 5 parts water with 1 part flour (by weight), then heat the mixture. It should thicken and become gelatinous. I like to add some of the extra water at this point to the still hot gelatinous mixture to speed the cooling process as well as thin the mixture which helps it better incorporate into the flour mixture. Let it cool briefly (so as not to kill the yeast), then add it to the remaining ingredients.
The type of flour makes a big difference when it comes to pizza dough. A high protein flour gives the crust a chewier pull so you should use a high protein flour (as high as you can find). At most grocery stores, the highest protein option is a bread flour (12-13% protein) which works beautifully. But an even better option than ordinary bread flour is King Arthur Hi-Gluten Flour (14% protein), which is available online. The following recipe is designed for a high gluten flour, which will need a bit more water than other flours in order to properly hydrate. If you are using regular bread flour, make the noted adjustments.
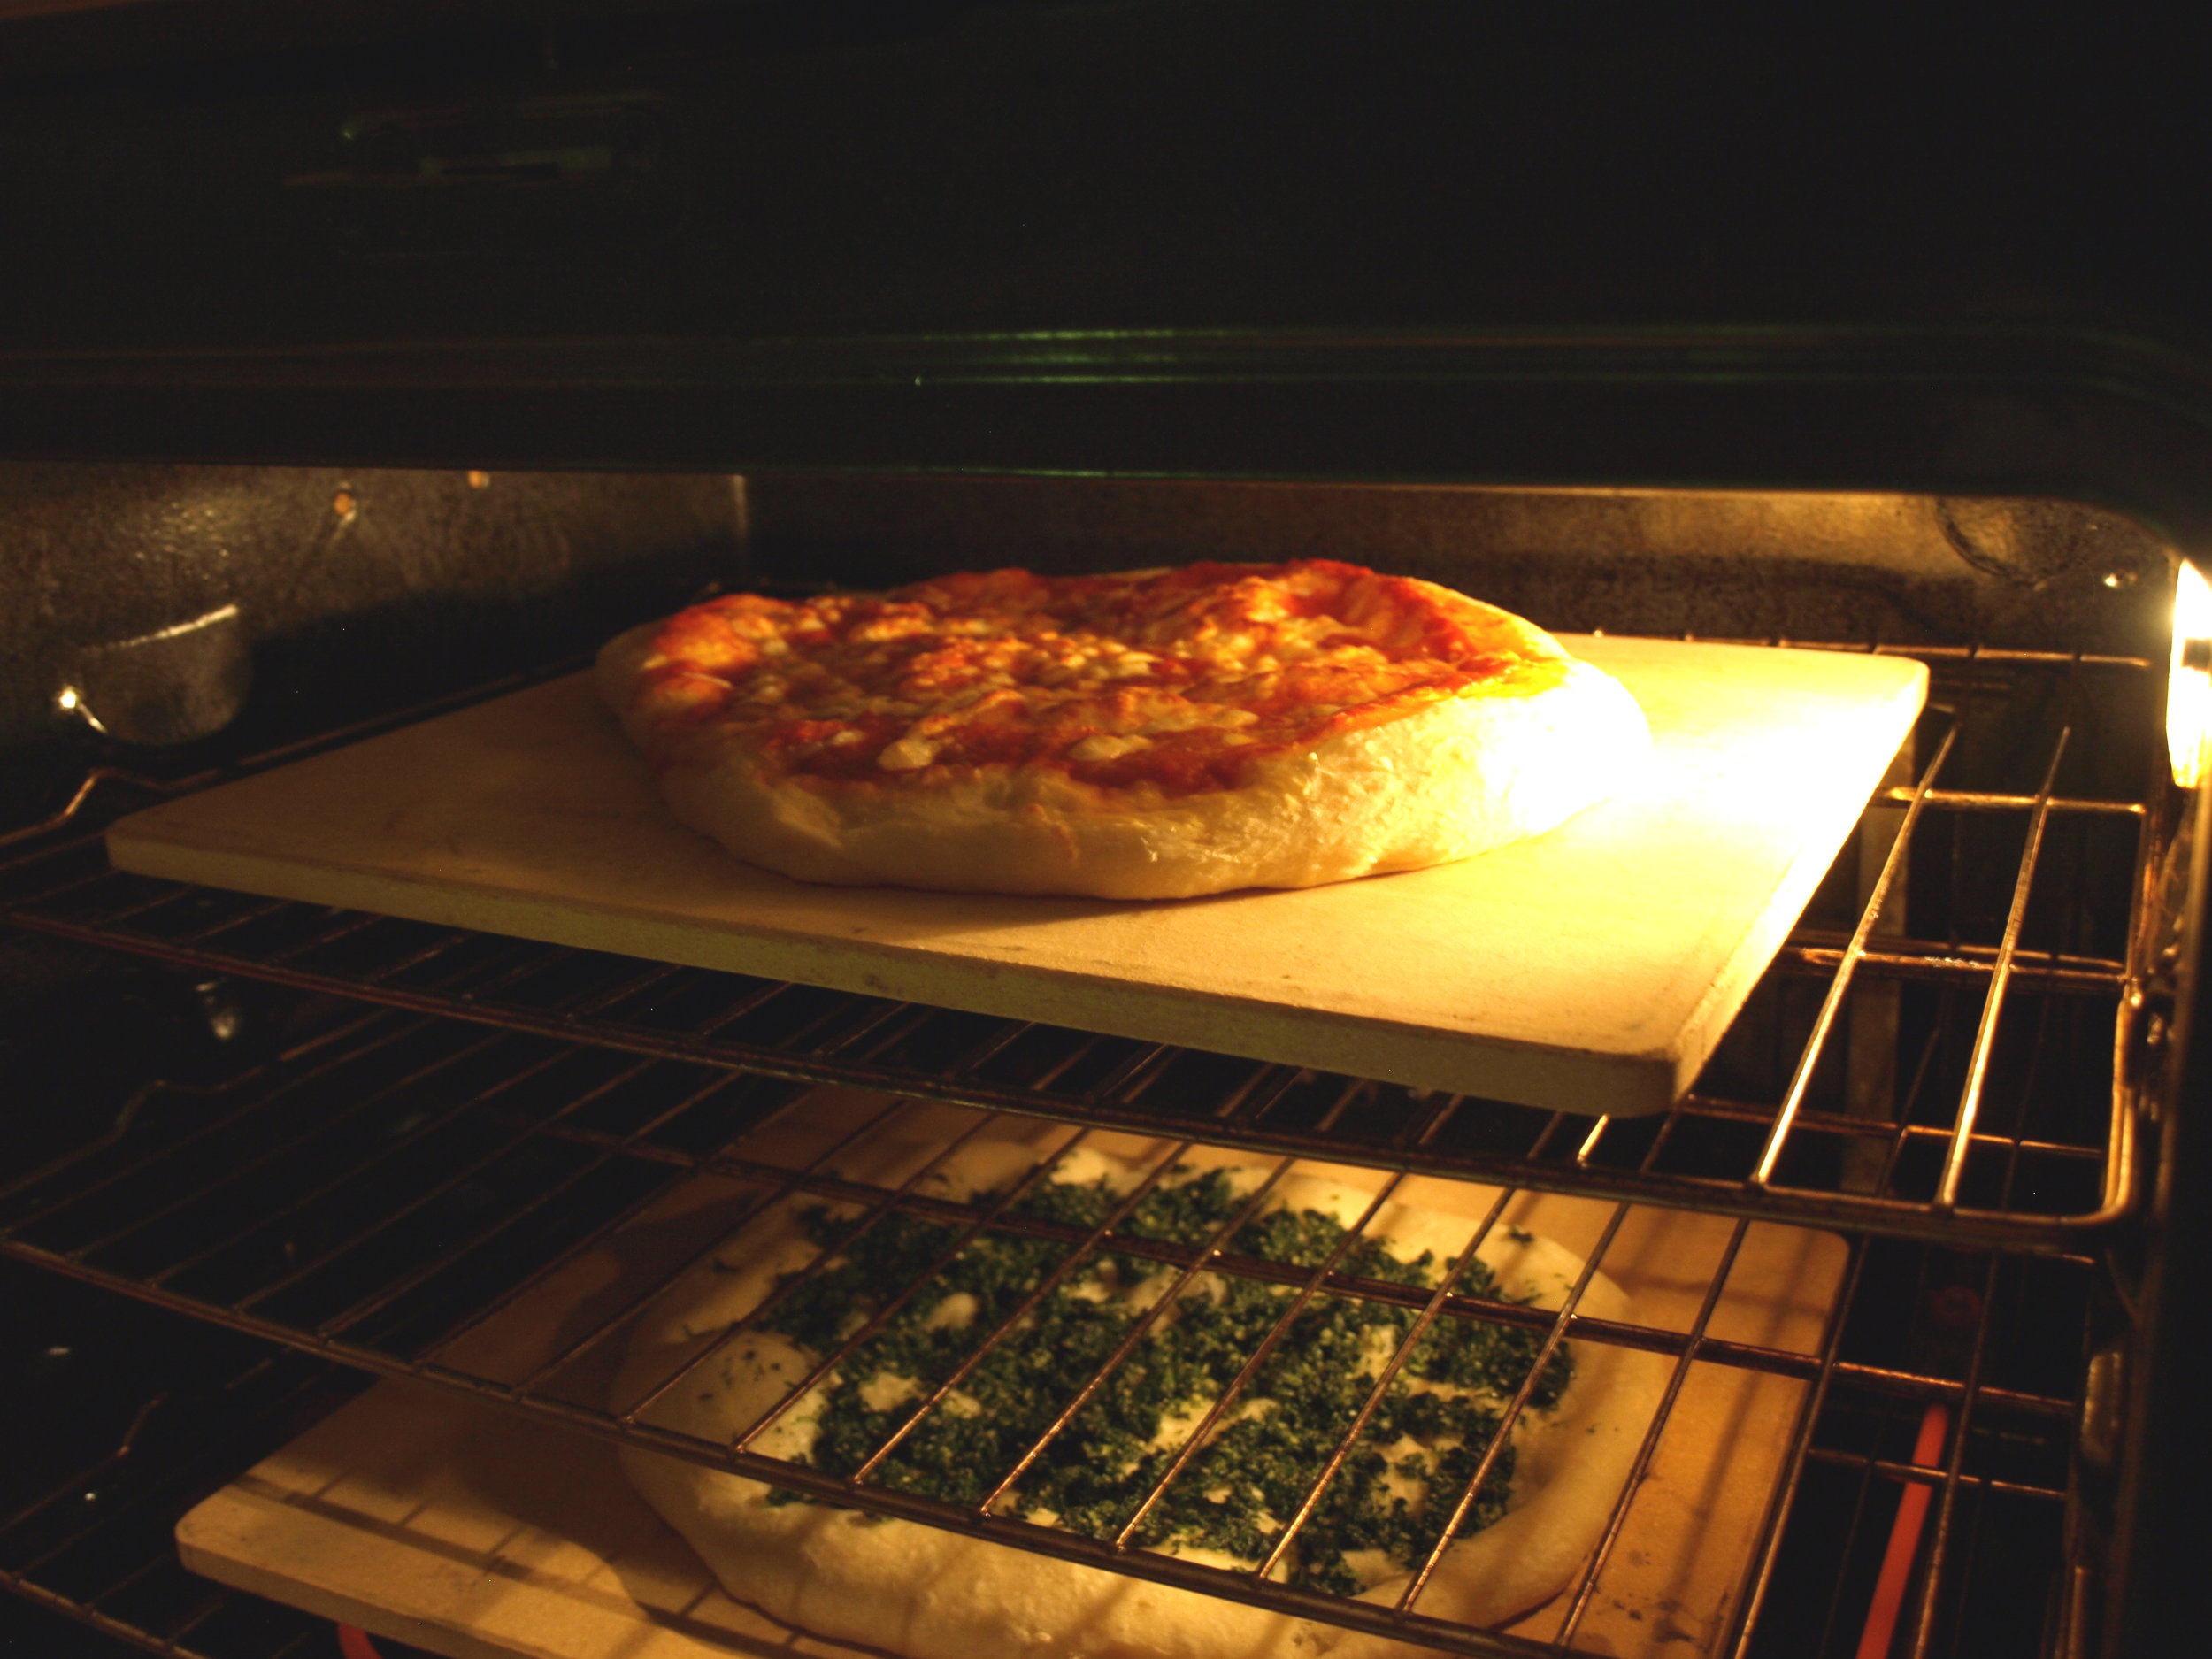
I prefer using parchment paper when I cook pizza. More often than not, a sprinkle of flour, cornmeal or semolina is not sufficient for the moist dough to slide off of the peel and onto the the hot pizza stone. But when I apply a thin coat of olive oil to the parchment paper, it prevents the dough from sticking every time. Plus, it gives the bottom of the pizza a nicer crust. I love using a pizza stone, but if you don't have one, substitute with an upside down half sheet pan. Heat the stone or the pan when you preheat your oven. Be aware that you should avoid sudden temperature changes to your stone so it doesn't crack. After cooking, leave it in the oven to cool slowly. The measurements given are pretty fussy but they don't need to be followed exactly - I supplied exact amounts to make it easier for those who want them.
I prefer instant yeast, but I have also included an alternative recipe (scroll down) if you prefer using active dry yeast. See note here on instant yeast versus active dry yeast.
For the same ingredients and technique but different quantities to make a pan pizza version in a half sheet pan (~11¾” x 16¾” or 29.8 x 42.5 cm) see my recipe for High Altitude Tangzhong Pan Pizza Dough here.
See my Mustard Green Pesto Pan Pizza recipe here.
See my Crispy Edged Cheese Pan Pizza recipe here.


High Altitude Tangzhong Pizza Dough (Using Instant Yeast)
Scroll down for recipe using Active Dry Yeast
Makes two 12" (30 cm) pizzas
4 cups Hi-Gluten or bread flour (1 pound 1.2 ounce or 488 grams) - divided (see note for accurately measuring flour here)
1¼ teaspoons instant yeast - 4 grams
1 tablespoon (17 grams) kosher salt (decrease to ¾ tablespoon if using table salt)
2 cups + 2 tablespoons water - 17 ounces (482 grams) - divided (1¾ cups + 3 tablespoon water - 15.5 ounces (439 grams)- if using regular bread flour). More water may be necessary, especially in the drier winter months
In a saucepan, whisk together 1.5 ounces flour (5½ tablespoons or 43 grams) with 7.5 ounces water (¾ cup + 3 tablespoons or 213 grams) until smooth. Heat and continue whisking until the mixture is thick and gelatinous - I recommend heating until bubbling to assure the mixture reaches the necessary temperature, and switch from a whisk to a rubber spatula if necessary. Stir continuously as you want a smooth mixture without lumps. Remove from the heat, and add enough of the reserved water (about ½ cup - 4 ounces or 113 grams) to cool the mixture sufficiently so as not to kill the yeast when added to the flour and yeast. Whisk the mixture to blend completely.
Place remaining 15.7 ounces (445 grams) of flour into a large bowl with the instant yeast and salt. Stir. Make a well in the center of the dry ingredients; add the cooled, diluted gelatinous mixture and enough of the remaining water so that it starts to come together. Stir all of the ingredients together, then let it sit for 1 minute as the flour absorbs the liquid. After 1 minute, add more water as needed (this amount will vary based on humidity levels and the season). You want a moist and craggy dough - see my picture above. Rather than knead the dough, I prefer to simply stretch and roll it. The wet dough benefits from the no knead method. Update: I have tried many different techniques - and I have come to prefer stretching and folding the dough ~ 3-4 times during the rising time - instead of just one time as it makes a lighter and airier dough (but still chewy). So after making the craggy dough - cover the bowl with plastic wrap and let rest ~ 30 minutes. Now that the dough has rested - stretch and fold the dough as follows: Using a rubber spatula or your fingers, lift part of the dough, stretch it, and then fold it back onto the ball of dough. Rotate the bowl 90° and repeat pinching, stretching and folding 3 more times until you have made your way around the bowl. I then lift the ball of dough out of the bowl and continue to pull the dough onto itself to form a tight ball. Replace the dough in the bowl and cover. Repeat this stretching and folding process approximately every 40 minutes. Do this 1 or 2 more times. Cover and rest 30 minutes. (The entire process of resting and stretching will take about 2 - 3 hours.) Note: If this dough schedule doesn’t mesh with your schedule - just do what does work into your schedule even if it is only one stretch and fold (I previously always did one stretch and fold and was very happy with the results). This dough is very forgiving.
Separate the dough into two balls. Lift each dough ball and stretch it under itself, pulling it into a ball shape. If you do not plan on using the dough until the next day (which I recommend), place each ball into an un-greased bowl, then cover it with plastic wrap in the refrigerator. (I prefer making the dough a day ahead because 1) a slow rise results in a more flavorful dough, and 2) working with cold dough is easier - you are less likely to tear a hole in the dough or stretch it too thin.) If using the dough the day you make it, cover and let rise about 30 minutes - 1 hour before proceeding as below.
The next day, remove cold dough from the refrigerator and proceed as below.
Brush 2 pieces of parchment paper (see tip on parchment paper) with a thin coating of olive oil and set aside. Lightly flour one ball of dough. Press it into a disk on a lightly floured board, while trying to retain its rim around the edge. Press the center of the circle while slowly pulling the dough outward, in order to form a pizza shape with a lip. Lift and stretch the dough, letting gravity help form it into a circle (or oval, depending on your pizza stone's shape). If it fights back and shrinks when you lay it back on the board, let it rest for a few minutes, then stretch it out again. Repeat this process until your dough is the size you want. Don't use a rolling pin to roll out your dough, doing this flattens the edges and you lose the beautiful crust. Lay the dough on the oiled parchment and cover it with plastic wrap so that it can rise one final time before baking (~1 hour for cold dough, ~30-45 minutes for room temperature dough). Preheat oven with a pizza stone in it (or an upside down baking sheet) to the highest temperature available (usually 450°F / 232°C or 500°F / 260°C). A long preheat of at least 45 minutes allows the pizza stone to get sufficiently hot.
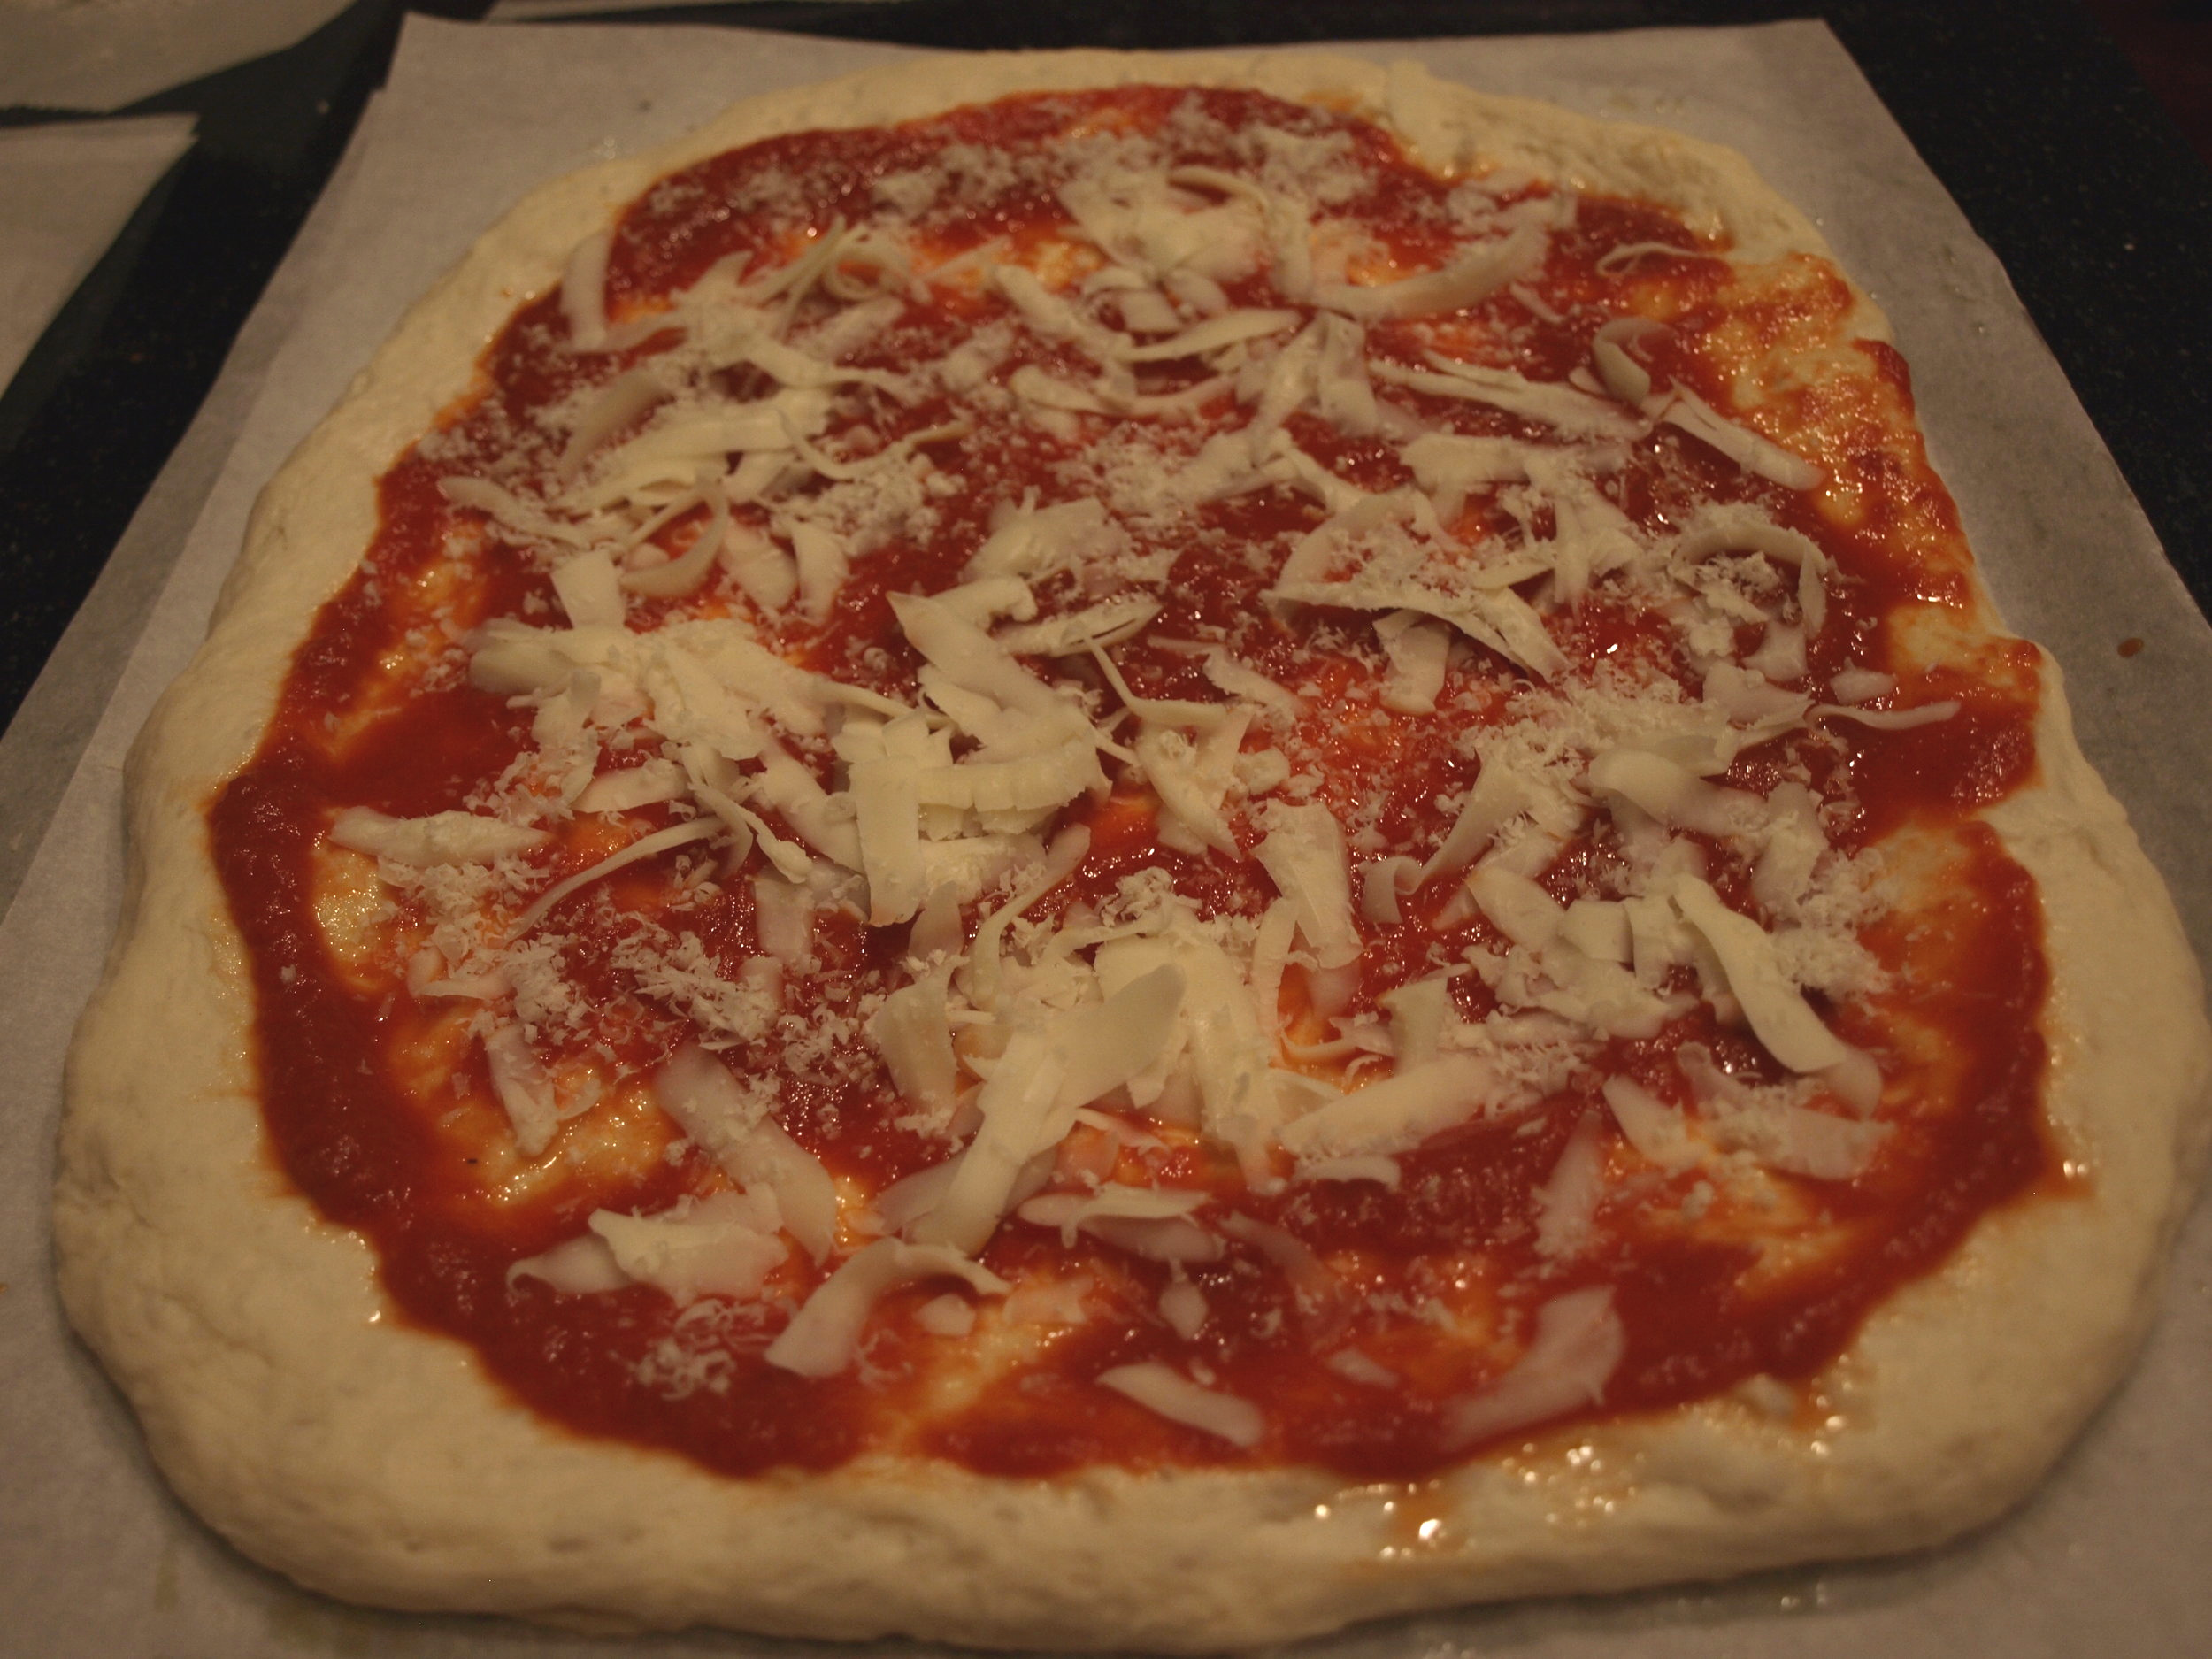
Remove the plastic wrap and top your pizzas (I love a plain marinara pizza; keeping it simple really showcases a great sauce and a great dough). My tomato sauce recipe is here. If using a stone, slide the oiled parchment onto a second piece of parchment (the first piece tends to become saturated and doesn't slide well) and then onto a pizza paddle or a sideless cookie sheet. Slide the pizza and parchment onto the pizza stone in the oven. After 5 minutes at a very high heat, the crust should set slightly and release itself from the parchment paper, so I like to slide my pizza paddle under the pizza and carefully pull out the parchment paper (this step is optional). This ensures that the parchment paper won't burn, and that the bottom crust will cook well. Rotate the pizza for even cooking. Cook for another ~5 minutes (if your oven is at 500°F / 260°C), or ~10 minutes if your oven is set to a lower temperature.
High Altitude Tangzhong Pizza Dough (Using Active Dry Yeast)
Makes two 12" pizzas
4 cups Hi-Gluten or bread flour (1 pound 1.2 ounce or 488 grams) - divided (see note for accurately measuring flour here)
1½ teaspoons active dry yeast - 5 grams
1 tablespoon (17 grams) kosher salt (decrease to ¾ tablespoon if using table salt)
2 cups + 2 tablespoons water - 17 ounces or 482 grams - divided (1¾ cups + 3 tablespoons water - 15.5 ounces or 439 grams - if using regular bread flour). More water may be necessary, especially in the drier winter months
In a saucepan, whisk together 1.5 ounces flour (5½ tablespoons or 43 grams) with 7.5 ounces water (¾ cup + 3 tablespoons or 213 grams) until smooth. Heat and continue whisking until the mixture is thick and gelatinous - I recommend heating until bubbling to assure the mixture reaches the necessary temperature, and switch from a whisk to a rubber spatula if necessary. Stir continuously as you want a smooth mixture without lumps. Remove from the heat, and add ⅓ cup of the reserved water cooling and thinning the mixture slightly. Whisk the mixture to blend completely. Set aside to cool. In a small pan, heat ⅓ cup (77 grams) of the water to ~100°F-110°F / ~38°C-43°C (do not exceed 110°F / 43°C). Pour into a small container and stir in 1 teaspoon (3 grams) of the pre-measured flour (or 1 teaspoon - 3 grams- sugar if you prefer). Sprinkle and stir in 1½ teaspoons (5 grams) active dry yeast. Allow 5-10 minutes for it to get frothy.
Place remaining 15.7 ounces of flour (less 1 teaspoon used for proofing the yeast) (or 442 grams) into a large bowl with the salt. Stir. Make a well in the center of the dry ingredients; add the cooled diluted gelatinous mixture (be certain the mixture does not exceed 110°F / 43°C), the frothy yeast mixture and enough of the remaining water so that it starts to come together. Stir all of the ingredients together, then let it sit for 1 minute as the flour absorbs the liquid. After 1 minute, add more water as needed (this amount will vary based on humidity levels and the season). You want a moist and craggy dough - see my picture above. Rather than knead the dough, I prefer to simply stretch and roll it. The wet dough benefits from the no knead method. Update: I have tried many different techniques - and I have come to prefer stretching and folding the dough ~ 3-4 times during the rising time - instead of just one time as it makes a lighter and airier dough (but still chewy). So after making the craggy dough - cover the bowl with plastic wrap and let rest ~ 30 minutes. Now that the dough has rested - stretch and fold the dough as follows: Using a rubber spatula or your fingers, lift part of the dough, stretch it, and then fold it back onto the ball of dough. Rotate the bowl 90° and repeat pinching, stretching and folding 3 more times until you have made your way around the bowl. I then lift the ball of dough out of the bowl and continue to pull the dough onto itself to form a tight ball. Replace the dough in the bowl and cover. Repeat this stretching and folding process approximately every 40 minutes. Do this 1 or 2 more times. Cover and rest 30 minutes. (The entire process of resting and stretching will take about 2 - 3 hours.) Note: If this dough schedule doesn’t mesh with your schedule - just do what does work into your schedule even if it is only one stretch and fold (I previously always did one stretch and fold and was very happy with the results). This dough is very forgiving.
Separate the dough into two balls. Lift each dough ball and stretch it under itself, pulling it into a ball shape. If you do not plan on using the dough until the next day (which I recommend), place each ball into an un-greased bowl, then cover it with plastic wrap in the refrigerator. (I prefer making the dough a day ahead because 1) a slow rise results in a more flavorful dough, and 2) working with cold dough is easier - you are less likely to tear a hole in the dough or stretch it too thin.) If using the dough the day you make it, cover and let rise about 1 hour before proceeding. If using the dough the next day, proceed as below.
Brush 2 pieces of parchment paper (see tip on parchment paper) with a thin coating of olive oil and set aside. Lightly flour one ball of dough. Press it into a disk on a lightly floured board, while trying to retain its rim around the edge. Press the center of the circle while slowly pulling the dough outward, in order to form a pizza shape with a lip. Lift and stretch the dough, letting gravity help form it into a circle (or oval, depending on your pizza stone's shape). If it fights back and shrinks when you lay it back on the board, let it rest for a few minutes, then stretch it out again. Repeat this process until your dough is the size you want. Don't use a rolling pin to roll out your dough, doing this flattens the edges and you lose the beautiful crust. Lay the dough on the oiled parchment and cover it with plastic wrap so that it can rise one final time before baking (~1 hour for cold dough, ~30-45 minutes for room temperature dough). Preheat oven with a pizza stone in it (or an upside down baking sheet) to the highest temperature available (usually 450°F / 232°C or 500°F /260°C ). A long preheat of at least 45 minutes allows the pizza stone to get sufficiently hot.
Remove the plastic wrap and top your pizzas (I love a plain marinara pizza; keeping it simple really showcases a great sauce and a great dough). My tomato sauce recipe is here. If using a stone, slide the oiled parchment onto a second piece of parchment (the first piece tends to become saturated and doesn't slide well) and then onto a pizza paddle or a sideless cookie sheet. Slide the pizza and parchment onto the pizza stone in the oven. After 5 minutes at a very high heat, the crust should set slightly and release itself from the parchment paper, so I like to slide my pizza paddle under the pizza and carefully pull out the parchment papers. This ensures that the parchment paper won't burn, and that the bottom crust will cook well. Rotate the pizza for even cooking. Cook for another ~5 minutes (if your oven is at 500°F / 260°C), or ~10 minutes if your oven is set to a lower temperature.

